背景
公司现在有一个需求,需要将服务器CentOS的文件定时增量到Windows服务器,Windows服务器连接了存储服务器磁盘阵列,空间比较大。基于这样的需求,我们采用inotify+rsync增量备份的解决方案。
服务器配置
| IP地址 | 系统 |
|---|---|
| 192.168.1.100 | CentOS7.x |
| 192.168.1.101 | Windows Server 2012 r2 |
Windows
1. 安装cwRsyncServer
- 下载地址:https://www.backupassist.com/rsync/

- 双击安装
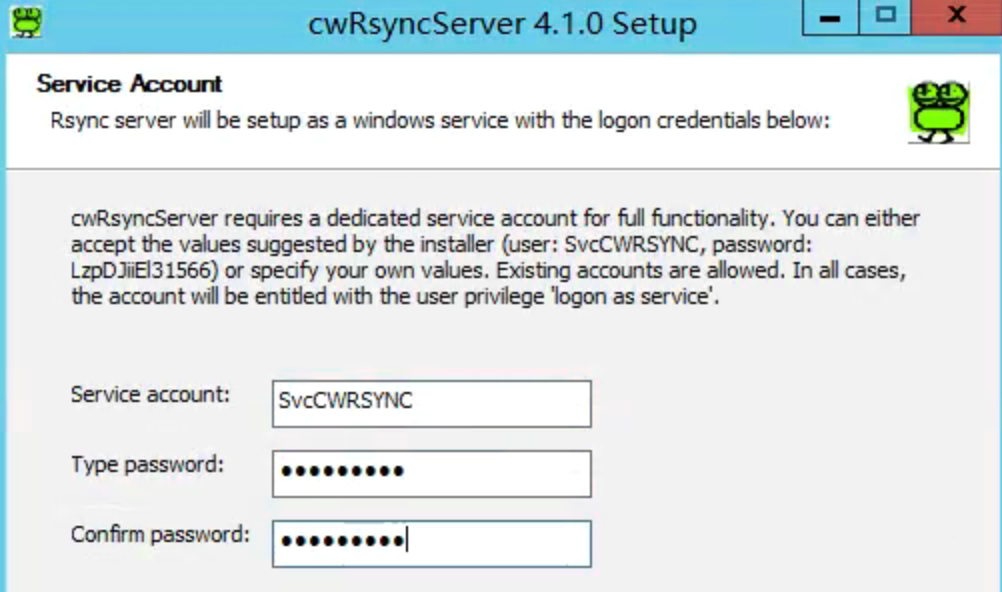
- 设置服务名和密码
注意:这里的服务器名和密码用于后面配置项目中,默认用户名:SvcCWRSYNC,密码设置为admin123,注意这里要用强口令,否则无法创建用户

- 配置文件

use chroot = false
strict modes = false
hosts allow = *
log file = rsyncd.log
uid = 0 # 需要配置此项,不然连接报错
gid = 0 # 需要配置此项,不然连接报错

# Module definitions
# Remember cygwin naming conventions : c:\work becomes /cygwin/c/work
#
#[test]
#path = /cygdrive/c/work
#read only = false
#transfer logging = yes

[rsyncdata]
path = /cygdrive/e/cdbid-pro1.0-backup/57
read only = false # 只读属性为false
list = no
hosts allow = *
auth users = SvcCWRSYNC # 对应配置用户名
secrets file = /cygdrive/e/cdbid-pro1.0-backup/rsync.passwd
- 新建rsync.passwd文件,填写如下
SvcCWRSYNC:admin123
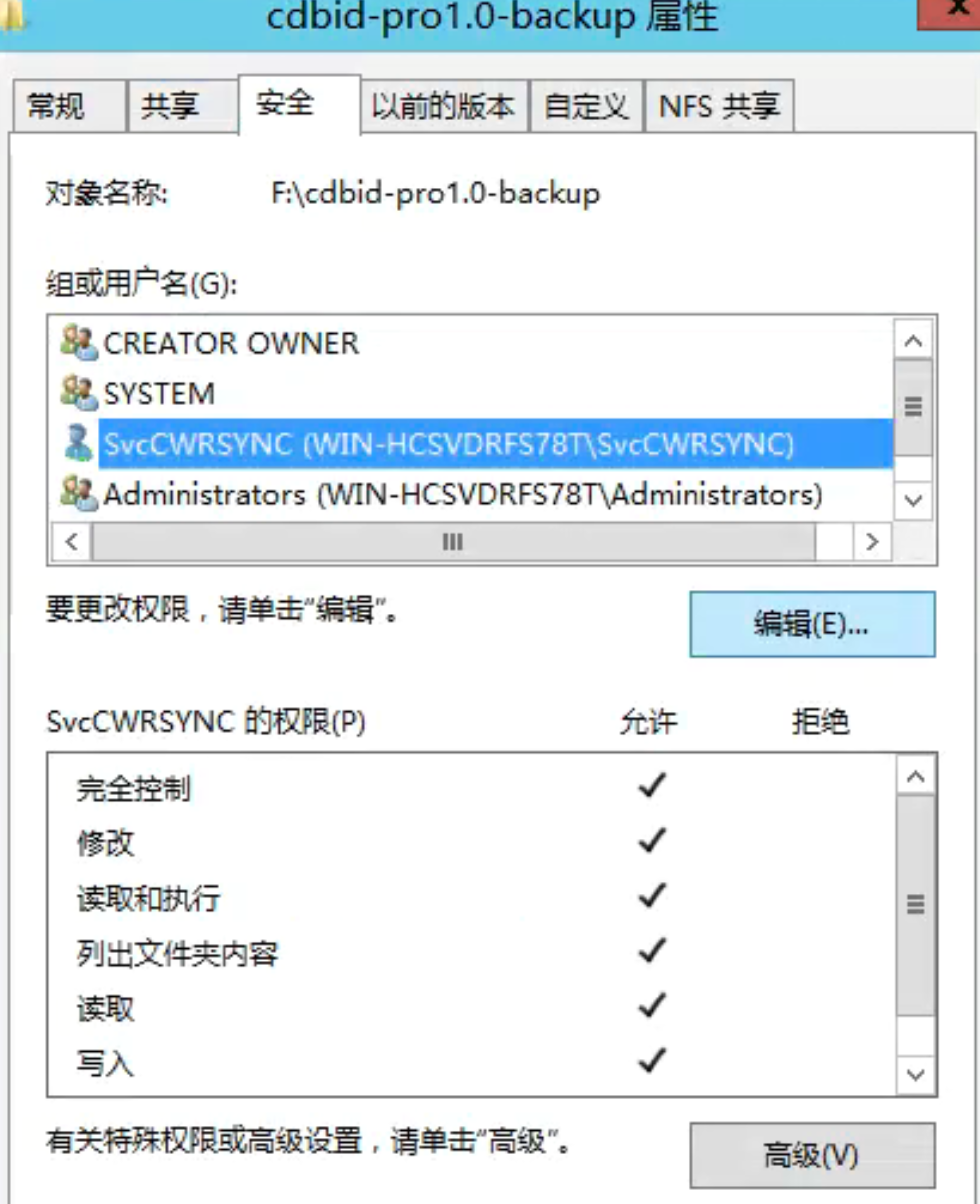
- 添加目录cdbid-pro1.0-backup目录访问权限,如果没有SvcCWRSYNC用户,点击高级添加

- 启动服务

Linux
1. 安装rsync
yum install rsync -y
2. 新建/etc/rsync.passwd,内容如下,注意客户端rsync只需要密码
admin123
3. 更改权限
chmod 600 /etc/rsync.passwd
4. 安装inotify
inotify-tools工具监测文件增加、删除和修改,同时同步到备份服务器windows
yum install inotify-tools -y
5. 启动脚本inotify_start.sh
#!/bin/bash
host=192.168.1.101
src=/home
des=rsyncdata
user=SvcCWRSYNC
inotifywait -mrq --timefmt '%d/%m/%y %H:%M' --format '%T %w%f%e' -e modify,delete,create,attrib $src | while read files
do
/usr/bin/rsync -vzrtopg --delete --progress --password-file=/etc/rsync.passwd $src $user@$host::$des
echo "${files} was rsynced" >>/tmp/rsync.log 2>&1
done
6. 测试
# 测试命令
/usr/bin/rsync -vzrtopg --delete --progress --password-file=/etc/rsync.passwd /root/test SvcCWRSYNC@192.168.1.101::rsyncdata

7. 后台运行启动脚本
inotify_start.sh &
服务自启动脚本
1. CentOS7
- 将inotifyd.service文件拷贝到/usr/lib/systemd/system/目录下
- 启动服务:systemctl start inotifyd.service
- 自动启动:systemctl enable inotfyd.service
- 修改后执行:systemctl daemon-reload
[Unit]
Description=inotify rsync script
After=network.target
After=network-online.target
Wants=network-online.target

[Service]
Type=simple
User=root
Group=root
PIDFile=/var/run/inotify.pid
ExecStart=/usr/bin/nohup /root/inotify_start.sh > /root/inotify.log 2>&1 &
ExecReload=
ExecStop=/usr/bin/ps -ef | /usr/bin/grep inotify | /usr/bin/grep -v grep | /usr/bin/awk '{print $2}' | /usr/bin/xargs /usr/bin/kill -9
PrivateTmp=true

[Install]
WantedBy=multi-user.target
2. CentOS6
- 将inotifyd拷贝到/etc/init.d/目录下
- 启动服务:/etc/init.d/inotifyd start
- 自动启动:chkconfig inotifyd on
#!/bin/sh
# chkconfig: - 91 35
# description: inotifyd

# Source function library.
if [ -f /etc/init.d/functions ] ; then
  . /etc/init.d/functions
elif [ -f /etc/rc.d/init.d/functions ] ; then
  . /etc/rc.d/init.d/functions
else
  exit 1
fi

# Avoid using root's TMPDIR
unset TMPDIR

# Source networking configuration.
. /etc/sysconfig/network

EXEC_FILE="/root/inotify_start.sh"
LOCK_FILE="/var/lock/subsys/inotifyd"
OPTIONS="> /root/inotify.log 2>&1 &"
RETVAL=0

start() {
     echo -n $"Starting $(basename $EXEC_FILE) services: "
     # daemon $EXEC_FILE $OPTIONS
     daemon $EXEC_FILE $OPTIONS
     RETVAL=$?
     echo

     [ $RETVAL -eq 0 ] && touch $LOCK_FILE || \
        RETVAL=1
     return $RETVAL
}

stop() {
     echo -n $"Shutting down $(basename $EXEC_FILE) services: "
     # killproc $(basename $EXEC_FILE)
     ps -ef | grep inotify | grep -v grep | awk '{print $2}' | xargs kill -9
     RETVAL=$?
     echo

     [ $RETVAL -eq 0 ] && rm -f $LOCK_FILE
     return $RETVAL
}

restart() {
     stop
     start
}

reload() {
     stop
     start
}

rhstatus() {
     status $(basename $EXEC_FILE)
     RETVAL=$?

     if [ $RETVAL -ne 0 ] ; then
          return $RETVAL
     fi
}


# Allow status as non-root.
if [ "$1" = status ]; then
       rhstatus
       exit $?
fi

# Check that we can write to it... so non-root users stop here
# [ -w $CONF_FLIE ] || exit 4

case "$1" in
  start)
       start
     ;;
  stop)
       stop
     ;;
  restart)
       restart
     ;;
  reload)
       reload
     ;;
  status)
       rhstatus
     ;;
  condrestart)
       [ -f $LOCK_FILE ] && restart || :
     ;;
  *)
     echo $"Usage: $0 {start|stop|restart|reload|status|condrestart}"
     exit 2
esac

exit $?


评论区